Distance Learning Tips
Time Management
Organize Your Students' Day with Google Calendar
If you are struggling with multiple sources of information from papers to emails and notifications, let me show you how to organize that information into an easy to read schedule for your student or their caregiver.
I've spent years using GSuite exclusively for organizing and communicating during my work day so I learned these systems well before I ever thought we'd be doing the same thing for our children!
Where We're At
We are 1 week into the Fall 2020 experiment with Distance Learning. Here in Rhode Island, our district chose to start the school year with a hybrid model, meaning that all students Distance Learn on Mondays and half the students go into school on Tuesday/Wednesday and the other half go into school on Thursday/Friday. We also had the option to do 5 days of Distance Learning, which was our chosen path for at least the next month or so. My family has graciously accepted the task of helping our girls learn during the day so I had to create a solution that would work for multiple caregivers and our 3rd and Kindergarten students.
Regardless of our decision, we knew we'd again become intimate with our old friend, Google and Google Classroom. Google certainly has its quirks, but once you know a few tricks, you'll soon see how you can make it work for distance learning!
Follow the steps below and then check out the quick video I made to show you the process live.
Step 1: Activate the Waffle.
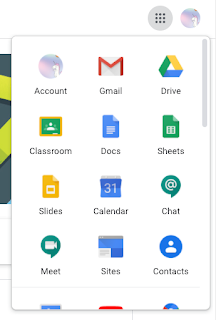
Once you are logged into your student's account take a look around the screen. See those 9 dots in the top-right of any Google-related page (Google Classroom, Gmail, etc). Click on it.
*Note, I've found that the number 1 source of frustration is a result of not being logged in to the student's account. If you're unable to access something always check to ensure you are logged in.
Here you can access Google's Suite of tools and apps:- Gmail
- Drive
- Classroom
- Calendar
- Meet
Step 2: Go to Google Calendar
Google Calendar/GCal/Calendar is where we'll be organizing your student's schedule.
Then fill out the meeting details:
- Add time
- If recurring, select the frequency
- Add meeting link in the description
- SAVE
Step 3: Rinse and Repeat
Using the schedule provided by your student's teacher, create a meeting for each time block/activity.
Step 4: Review any new information on Sunday Night
Each Sunday, our teachers email us with any updates or changes to the schedule. Use this time to update or add any assignments to the upcoming week's time blocks. I'll copy and paste any additional notes or links from the teacher so my caregivers are required to re-read all of the emails we've received.
Step 5: The Final Product
Ta da! The goal is to have an organized tool for your student and caregiver to quickly understand what needs to be done at any given point in the day.
Notifications will remind your students when a time block is starting, at which point they can click on the calendar and find all of the information they need included in the description.
Watch the Video
Chromebook Tips
New to Chromebooks? I have a post on Distance Learning: Chromebook Hacks you should check out!


No comments
Post a Comment